Keeping the Root Flare Clear of Turf and Mulch
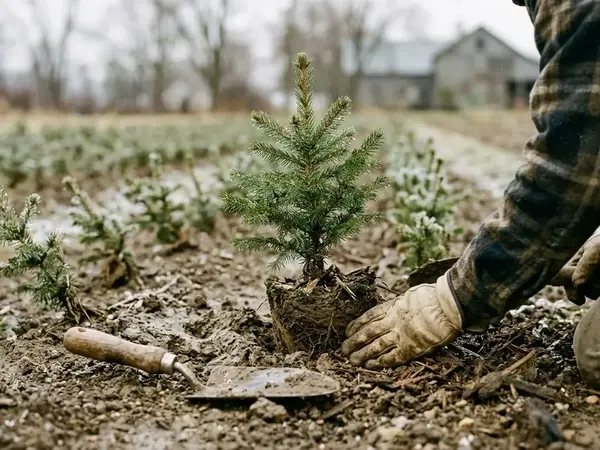
Kneel beside a newly set balsam fir and look for the exact spot where the straight stem widens into the top structural roots. That swollen base is the root flare. It has to stay in open air for the life of the tree. When turf, loose soil, or wood chips rest against that transition, they trap dampness against bark that was built to stay dry above ground.
In a small McHenry County planting, what happens in the dirt right around the trunk determines how well a young tree settles in. Left alone, pasture grass and broadleaf weeds crowd the base, drinking up rainfall before establishing roots can reach it. Tall blades also cast shade over the lowest needles, thinning out the bottom whorl before the tree even gets its footing.
Wait until July to deal with that turf and you will spend the summer fighting entrenched roots with a string trimmer right next to tender bark. Setting a clean, well-managed ring takes four deliberate moves across the year:
- Lift the competing sod out beyond the drip line so grass crowns cannot drink the tree's moisture.
- Pick a breathable cover like coarse wood chips or clean straw that fits northern Illinois frost heaves and wet springs.
- Spread that cover inward from the outer edge, stopping short to leave a collar of bare earth around the root flare.
- Walk the row at three seasonal turns to check soil moisture beneath the cover, pull back slumped chips, and spot rodent tracks.
Slicing Out the Sod Ring Before Any Chips Go Down
Before tipping a single wheelbarrow of mulch, you have to deal with the turf already growing around the planting hole. Scalping grass down to the dirt with a trimmer or burying live sod under wood chips only buys a couple of weeks. Surviving grass crowns and perennial weed roots quickly send fresh shoots straight up through the cover, and you end up pulling grass out of loose chips all summer.
- Mark the outer boundary past the tips of the lowest branches. Stand over the young balsam fir and trace a circle on the ground that reaches at least as wide as the current branch spread. Setting the edge out there does two practical things at once: it pulls thirsty turf roots away from the establishing root zone, and it builds a clear buffer so mower wheels and deck guards never bump the lower boughs.
- Slice the perimeter with a flat spade and pry up the turf mat intact. Cut cleanly through the thatch along your marked line, then slide the blade under the root mat to lift the sod in manageable chunks. Work carefully as you get closer to the center so the spade edge does not nick the shallow roots radiating out from the trunk.
- Knock the loose topsoil back into the basin and haul the green clods away. Give each lifted clump a sharp tap over the cleared circle to save your good black dirt, then toss the crowns and roots into a cart to compost away from the row. Even small fragments of living sod left sitting on the dirt can root back in after a rain.
- Check the grade right at the trunk before reaching for mulch. As you shake soil off those lifted clods, watch where the loose dirt lands. Brush away any soil that tumbled against the stem or settled over the root flare, leaving the natural ground level flat and the widened base of the trunk completely exposed.
Picking Coarse Chips or Clean Straw for Northern Illinois Rows
What you lay over that bare dirt has to handle our local weather swings. In McHenry County, a winter of freeze-thaw heaving often gives way to heavy spring rains that leave low spots saturated, followed by stretches of summer heat that bake bare clay hard. A good ground cover shades out sprouting weed seeds and slows surface evaporation while still letting rainwater and air move freely into the root zone.
Shredded hardwood bark and coarse, clean wood chips from local tree work do that job well on a small planting. Because the pieces are irregular and chunky, they lock together loosely enough to resist washing away in a downpour without compacting into a tight seal. Clean straw also works if you need something light to carry down a long row by hand, though you have to watch for wind blowing it across the field and check every bale for leftover grain heads that will sprout into a carpet of volunteer weeds.
Cooling Hot Chip Piles
When a fresh load of wood chips arrives from an arborist crew, push your hand into the center of the pile before loading your cart. If the interior feels hot or gives off a sharp, sour, steaming smell, let the pile sit and cool down in the yard before spreading it, and still keep those cooled chips completely off the bark once they go down.
Plenty of materials lying around a farmstead cause more headaches than they solve under evergreens. Leave fresh grass clippings out of the tree row; they mat down into a slick, smelly layer that heats up and sheds water instead of soaking it in. Skip any yard waste mixed with weed seeds that will turn your clean ring into a nursery bed. Crushed rock and landscape gravel belong on driveways, not under Christmas trees—stone adds nothing to the soil, holds heat in July, and gets thrown by mower blades or jammed against spades if you ever shear the lower branches or dig the tree later.
Instead of measuring the layer with a ruler, judge the cover by what it does on the ground. Spread your chips or straw thick enough to block sunlight from reaching weed seedlings on the soil surface and keep the dirt underneath cool, while keeping the layer loose and low enough that it never hides the flare or tumbles against the trunk.
Spreading Inward from the Outer Edge and Leaving a Bare Collar
Start with one newly set balsam fir at the head of the row and use it to set the visual standard for everyone helping you plant. Before dumping any chips, press your fingers into the bare dirt inside your cleared circle. If the soil feels dry and crumbly, give that basin a slow, deep soaking first; laying dry wood chips over parched ground can intercept light summer rains before the moisture ever reaches the roots.
Once the earth is damp, dump your mulch near the outer rim of the cleared circle and rake it inward toward the center. Stop pulling material forward well before it touches the stem. You want a distinct doughnut shape: a full ring of coarse cover reaching out to the branch tips, surrounding a clean collar of bare soil right around the trunk where the entire root flare sits in open air.
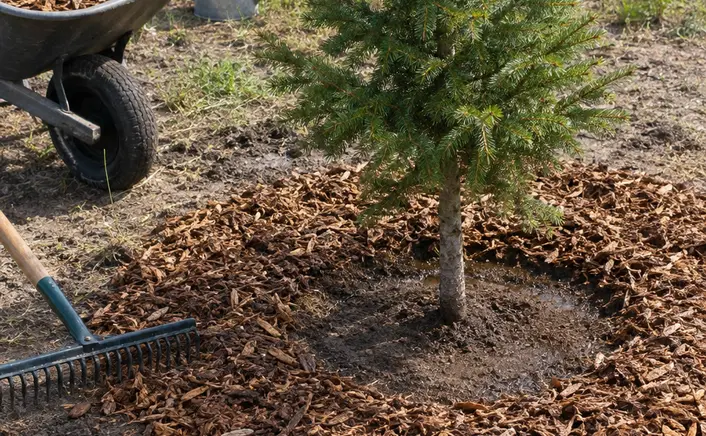
For folks used to landscaping beds where bark is piled high against foundation shrubs, a properly mulched Christmas tree looks unfinished in the middle. That open gap of bare dirt is the whole point. Piling mulch deeper or pushing it flush against the trunk to make a neat, continuous cone holds constant dampness against the bark and builds a hidden roof that mice and voles use to tunnel right up to the stem. If a few loose chips roll down the slope and land on the root flare while you are raking, reach in and pull them back the same day.
Three Seasonal Walks to Check Moisture, Slumped Chips, and Bark
A mulch ring needs looking after once it's down. Frost heaves, heavy thunderstorms, scratching birds, and settling bark change the shape of that basin over the course of a year. Rather than circling dates on a wall calendar, tie your row inspections to three clear turns in the northern Illinois seasons.
After the Spring Thaw
Walk the row once the frost leaves the ground and the winter snowpack melts away. Melting snow and freeze-thaw cycles often slump the inner wall of the mulch ring inward, sliding wet chips right over the root flare you worked so hard to expose on planting day. Reach down, pull any slumped material back to reopen the bare collar, and press your fingers into the dirt underneath the chips to see how well the basin is draining after the thaw.
During a Summer Dry Spell
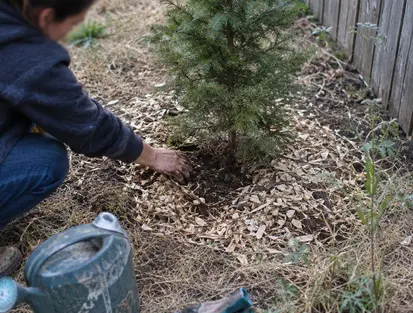
When rain gets scarce and the pasture turns brown, walk the planting to see how your young trees are holding up. Never judge moisture by looking at the top of the mulch—sun-bleached wood chips can look bone-dry on the surface while the earth underneath is still cool and damp. Push a handful of chips aside and feel the soil itself. Water the basin if that underlying dirt is dry; if a low spot has stayed soupy and waterlogged, rake the inner collar wider so air can reach the base. You want the flare visible and the soil beneath the mulch neither baked dry nor persistently soupy, so let those hand checks guide your watering hose.
Before the First Snow
Make one last pass in late autumn before winter weather locks the field down. Look closely at the base of the trunk and along the inner edge of the mulch for tiny runways, tunnel openings, or a bright, gnawed band of bark near ground level where meadow voles have started chewing. If wind or decomposition has thinned out the outer edge of the ring, top up the outer perimeter to protect roots through the freeze, keeping every bit of that fresh material out of the bare collar so rodents have nowhere to hide next to the stem over winter.
Set the Pattern on Planting Day Starting with Your First Tree
When you put young Christmas trees in the ground on a small McHenry County plot, lift the competing sod and lay your mulch ring the very same day you set the roots, and refuse to cover the root flare just to make the circle look tidy. Waiting until weeds overtop the lower branches turns simple preventative care into a rescue job, while burying the trunk base trades away bark health for a neat appearance.
Take a flat spade, a bucket of water, and a load of coarse, cooled wood chips out to the first newly planted balsam fir in your row right now. Slice and haul out the turf circle past the branch tips, soak the bare dirt if it feels dry, and spread your chips inward while leaving a wide, unmistakable collar of bare earth around the exposed flare. Once that single tree shows the doughnut shape you need, keep its three seasonal checkups in mind and work your way down the rest of the line using that first open collar as your guide.